How To Make Garden Hoops
How to Make a Row Cover Tunnel (Hoop House)

Simple hoop houses or low tunnels can dramatically extend the growing season. It's really easy to make your own – quickly, cheaply and to a very high standard. Read on or watch our video to find out how.
Make a Hoop House
For this project you'll need some PVC water piping about half an inch (12mm) wide, plus some 20in (50cm) long lengths of rebar, two pipe caps and some U-bolts or garden wire. To cover the tunnel you'll need some greenhouse plastic or strong polythene, some pipe insulation or similar soft material, and spring clamps to hold the cover in place. The only tools you'll need are a hacksaw and a hammer.
Hammer in the supports
Begin by hammering in the lengths of rebar at equal distances along your garden bed. These will support the hoops. Space them a maximum of three feet (90cm) apart along each side. Leave six to eight inches (15-20cm) of the rebar above ground.

Make the hoops
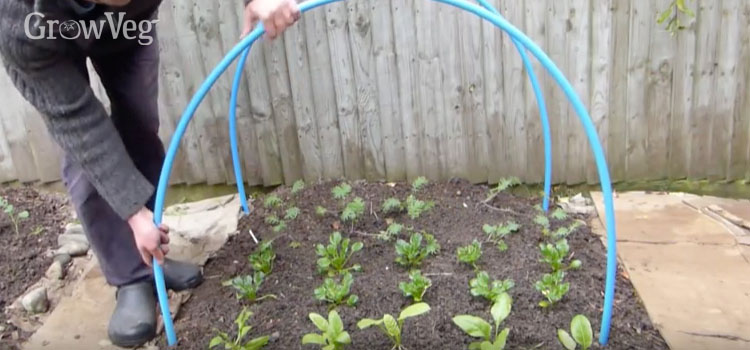
Now cut lengths of pipe to make the hoops. The hoops should be long enough to bend into a half circle, allowing a little extra to give enough height for plants growing near the sides. Flex the hoops into position onto their rebar supports.
Add the ridge pole
The ridge pole links the hoops together and stabilizes the structure. It will also support the cover to prevent sagging. Measure it out so that it slightly protrudes at each end of the hoop house. Cut to size then cap or tape the ends to stop them snagging the cover. Secure them onto the hoops with U-bolts or thick garden wire.
Cover the tunnel
Cover the hoop house with your polythene. You may need to cut this to size first. Secure it to the hoops using short lengths of soft rubber tubing or pipe insulation, slit and opened out lengthways. This protects the polythene from the clamps which follow to hold it all firmly in place.

Secure the cover in place
Weigh down the edges of the polythene with bricks. For a more thorough seal you can wrap the sides of the cover around a length of conduit or bamboo cane, which can then be pegged down at regular intervals using tent pegs. The ends of the cover should be pinned or weighed down whenever cold or frosty weather is forecast. This will also stop the wind from getting in underneath and tearing the cover off.
An alternative method
You can also make a row cover using heavy gauge mesh or cattle panels. Simply cut the panel to size using bolt cutters then flex the panel into shape. Don't leave any sharp edges, which could snag the cover – cut them off or cover with old hosepipe slit along its length to create a seal. Push or peg the tunnel into position then cover and secure as before.
Plan for an extended season
Adding row covers to your cropping schedule will help you to extend your growing season. Our Garden Planner allows you to add these and other protected structures to your plan with ease. Simply select 'Structures' from the drop down menu then scroll through the selection bar to choose the type of crop protection you want to use - for instance a hoop house. Click to pick it up, move the cursor to where you want it on your plan, then click or drag it out to place it. You can resize or rotate the tunnel using the handles. The accompanying plant list automatically adjusts the sowing and harvest dates to take account of the extra protection from frost that the tunnel gives. You can adjust these preset dates via the information box accompanying the structure description.

Low tunnels are easy and inexpensive to make, and they mean you can enjoy more fresh produce during the coldest months of the year, so it's well worth making your own. We'd love to hear how you protect your vegetables over winter, so drop us a comment below to tell us.
< All Guides
How To Make Garden Hoops
Source: https://www.growveg.com/guides/how-to-make-a-row-cover-tunnel-hoop-house/
Posted by: rossarman1993.blogspot.com

0 Response to "How To Make Garden Hoops"
Post a Comment